MCP (JAVA开发)
认识Model Context Protocol
MCP基本概念
**个人理解:**通过McpClient和McpServer可以实现跨语言mcp服务调用
也就是说python开发的服务编写McpServer;Java开发的服务McpClient,编写配置文件,向McpServer发起请求
Anthropic 公司开发,给AI和各类工具数据间搭建标准化桥梁。
大模型应用可以使用别人分析的MCP完成各种工作内容。
获取途径:
- awesome-mcp-servers
- mcp.so
MCP协议场景场景:
- 使用百度/高德地图分析旅线计算时间
- 接 Puppeteer 自动操作网页
- 使用 Github/Gitlab 让大模型接管代码仓库
- 使用数据库组件完成对 Mysql、ES、Redis 等数据库的操作
- 使用搜索组件扩展大模型的数据搜索能力
在Claude Desktop中体验MCP
Java开发基于Spring AI Alibaba玩转MCP:从发布、调用到 Claude 集成_博客-阿里云Spring AI Alibaba官网官网
MCP的架构
MCP主要分为MCP服务端和MCP客户端(这里要和常规的加以区分)
- 客户端:一般指大模型应用,比如Claude、通过Spring AI Alibaba和Langchain等开发的AI应用
- 服务端:链接各数据源的服务和工具
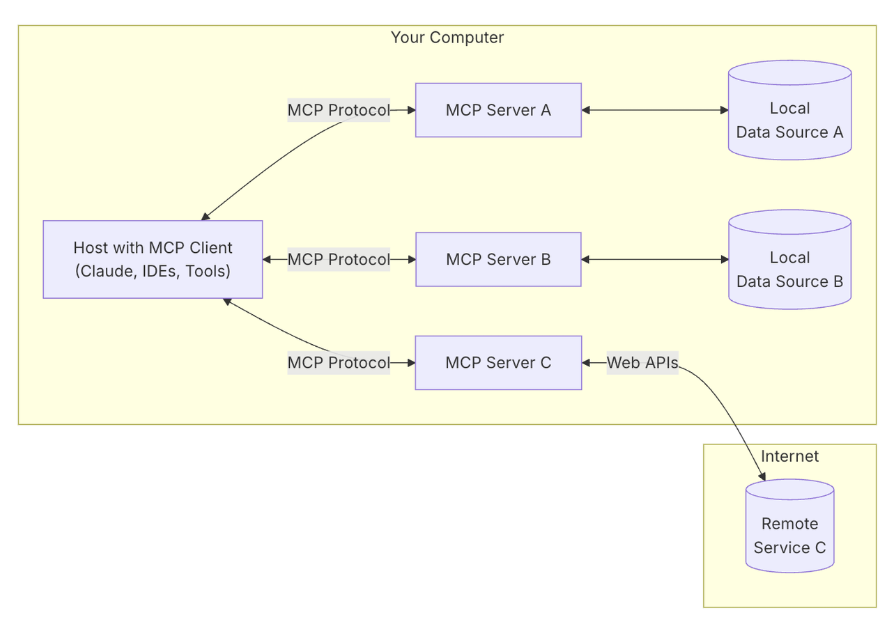
工作流程:
AI应用集成MCP客户端 ——> 通过MCP协议向MCP服务端发起请求。
MCP服务端可以连接本地/远程的数据源,或者通过API访问其他服务 ——> 从而完成数据的获取 ——> 返回给AI应用去使用。
在SpringAI中使用MCP Server
Spring AI MCP介绍
既然MCP是协议,Sprig AI MCP便是为模型上下文提供了JAVA和Spring框架的集成。
使得通过标准化接口与不同数据源工具进行交互,支持同步和异步。
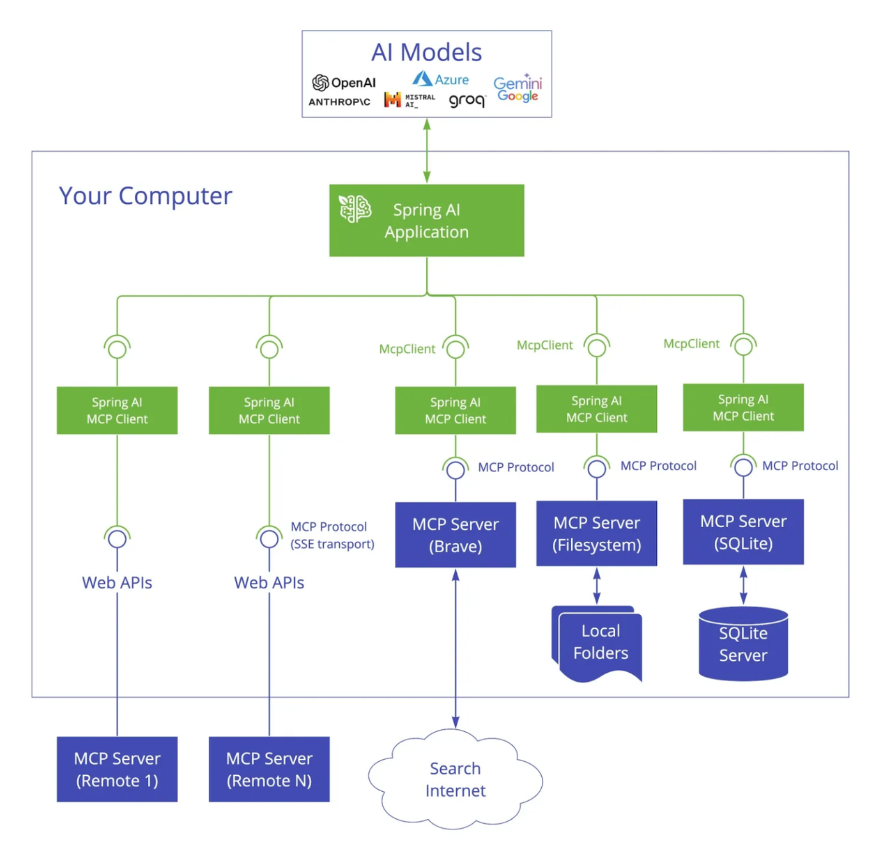
Spring AI MCP 采用模块化架构,包括以下组件:
- Spring AI 应用程序:使用 Spring AI 框架构建想要通过 MCP 访问数据的生成式 AI 应用程序
- Spring MCP 客户端:MCP 协议的 Spring AI 实现,与服务器保持 1:1 连接
通过 Spring AI MCP,可以快速搭建 MCP 客户端和服务端程序。
依赖和仓库镜像问题
由于依赖还没上传到Maven公共仓库,所以可以选择手动指定;这个在spring ai官网也有所提及
	<repositories>
        <repository>
            <name>Central Portal Snapshots</name>
            <id>central-portal-snapshots</id>
            <url>https://central.sonatype.com/repository/maven-snapshots/</url>
            <releases>
                <enabled>false</enabled>
            </releases>
            <snapshots>
                <enabled>true</enabled>
            </snapshots>
        </repository>
<!--        <repository>-->
<!--            <id>spring-milestones</id>-->
<!--            <name>Spring Milestones</name>-->
<!--            <url>https://repo.spring.io/milestone</url>-->
<!--            <snapshots>-->
<!--                <enabled>false</enabled>-->
<!--            </snapshots>-->
<!--        </repository>-->

        <repository>
            <id>spring-milestones</id>
            <name>Spring Milestones</name>
            <url>https://repo.spring.io/libs-milestone-local</url>
            <snapshots>
                <enabled>false</enabled>
            </snapshots>
        </repository>

        <repository>
            <id>spring-snapshots</id>
            <name>Spring Snapshots</name>
            <url>https://repo.spring.io/snapshot</url>
            <releases>
                <enabled>false</enabled>
            </releases>
        </repository>
    </repositories>
有时候spring-ai更新了,但是spring-ai-core还是老版本,可能遇到不兼容问题(1.0.0-M4无法使用MCP )
手动更新到最新版本:
<!--spring-ai-->
<dependency>
    <groupId>org.springframework.ai</groupId>
    <artifactId>spring-ai-core</artifactId>
    <version>1.0.0-M6</version>
</dependency>
检查方式:查看外部库


MCP常用的开发模式
Spring AI 提供了两种机制快速搭建 MCP Server,通过这两种方式开发者可以快速向 AI 应用开放自身的能力,这两种机制如下:
- 基于 stdio 的进程间通信传输,以独立的进程运行在 AI 应用本地,适用于比较轻量级的工具。
- 基于 SSE(Server-Sent Events) 进行远程服务访问,需要将服务单独部署,客户端通过服务端的 URL 进行远程访问,适用于比较重量级的工具。
然后关于实际开发其实主要两种:
- 本地client调用本地server
- 本地client调用远程server
个人感觉第二种用的更多,下面我们会都进行讲解
MCP客户端与本地MCP服务
基于stdio的MCP服务端Server实现
这里选用开源天气查询OpenMeteo
<!-- 添加Spring AI MCP starter依赖 -->
<dependency>
    <groupId>org.springframework.ai</groupId>
    <artifactId>spring-ai-mcp-server-spring-boot-starter</artifactId>
    <version>1.0.0-M6</version>
</dependency><version>版本记得时刻注意官网
server:
    port: 8081

spring:
    application:
        name: lec-ai

	#重点,必须禁用
    main:
        web-application-type: none # 必须禁用web应用类型
        banner-mode: off # 禁用banner

    ai:
        mcp:
            server:
                stdio: true
                name: my-weather-server
                version: 0.0.1
具体的server服务
@Service
public class OpenMeteoService {
// OpenMeteo免费天气API基础URL
private static final String BASE_URL = "https://api.open-meteo.com/v1";
private final RestClient restClient;
public OpenMeteoService() {
this.restClient = RestClient.builder()
.baseUrl(BASE_URL)
.defaultHeader("Accept", "application/json")
.defaultHeader("User-Agent", "OpenMeteoClient/1.0")
.build();
}
// OpenMeteo天气数据模型
@JsonIgnoreProperties(ignoreUnknown = true)
public record WeatherData(
@JsonProperty("latitude") Double latitude,
@JsonProperty("longitude") Double longitude,
@JsonProperty("timezone") String timezone,
@JsonProperty("current") CurrentWeather current,
@JsonProperty("daily") DailyForecast daily,
@JsonProperty("current_units") CurrentUnits currentUnits) {
@JsonIgnoreProperties(ignoreUnknown = true)
public record CurrentWeather(
@JsonProperty("time") String time,
@JsonProperty("temperature_2m") Double temperature,
@JsonProperty("apparent_temperature") Double feelsLike,
@JsonProperty("relative_humidity_2m") Integer humidity,
@JsonProperty("precipitation") Double precipitation,
@JsonProperty("weather_code") Integer weatherCode,
@JsonProperty("wind_speed_10m") Double windSpeed,
@JsonProperty("wind_direction_10m") Integer windDirection) {
}
@JsonIgnoreProperties(ignoreUnknown = true)
public record CurrentUnits(
@JsonProperty("time") String timeUnit,
@JsonProperty("temperature_2m") String temperatureUnit,
@JsonProperty("relative_humidity_2m") String humidityUnit,
@JsonProperty("wind_speed_10m") String windSpeedUnit) {
}
@JsonIgnoreProperties(ignoreUnknown = true)
public record DailyForecast(
@JsonProperty("time") List<String> time,
@JsonProperty("temperature_2m_max") List<Double> tempMax,
@JsonProperty("temperature_2m_min") List<Double> tempMin,
@JsonProperty("precipitation_sum") List<Double> precipitationSum,
@JsonProperty("weather_code") List<Integer> weatherCode,
@JsonProperty("wind_speed_10m_max") List<Double> windSpeedMax,
@JsonProperty("wind_direction_10m_dominant") List<Integer> windDirection) {
}
}
/**
* 获取天气代码对应的描述
*/
private String getWeatherDescription(int code) {
return switch (code) {
case 0 -> "晴朗";
case 1, 2, 3 -> "多云";
case 45, 48 -> "雾";
case 51, 53, 55 -> "毛毛雨";
case 56, 57 -> "冻雨";
case 61, 63, 65 -> "雨";
case 66, 67 -> "冻雨";
case 71, 73, 75 -> "雪";
case 77 -> "雪粒";
case 80, 81, 82 -> "阵雨";
case 85, 86 -> "阵雪";
case 95 -> "雷暴";
case 96, 99 -> "雷暴伴有冰雹";
default -> "未知天气";
};
}
/**
* 获取风向描述
*/
private String getWindDirection(int degrees) {
if (degrees >= 337.5 || degrees < 22.5)
return "北风";
if (degrees >= 22.5 && degrees < 67.5)
return "东北风";
if (degrees >= 67.5 && degrees < 112.5)
return "东风";
if (degrees >= 112.5 && degrees < 157.5)
return "东南风";
if (degrees >= 157.5 && degrees < 202.5)
return "南风";
if (degrees >= 202.5 && degrees < 247.5)
return "西南风";
if (degrees >= 247.5 && degrees < 292.5)
return "西风";
return "西北风";
}
/**
* 获取指定经纬度的天气预报
*
* @param latitude 纬度
* @param longitude 经度
* @return 指定位置的天气预报
* @throws RestClientException 如果请求失败
*/
@Tool(description = "获取指定经纬度的天气预报")
public String getWeatherForecastByLocation(double latitude, double longitude) {
// 获取天气数据(当前和未来7天)
var weatherData = restClient.get()
.uri("/forecast?latitude={latitude}&longitude={longitude}¤t=temperature_2m,apparent_temperature,relative_humidity_2m,precipitation,weather_code,wind_speed_10m,wind_direction_10m&daily=temperature_2m_max,temperature_2m_min,precipitation_sum,weather_code,wind_speed_10m_max,wind_direction_10m_dominant&timezone=auto&forecast_days=7",
latitude, longitude)
.retrieve()
.body(WeatherData.class);
// 拼接天气信息
StringBuilder weatherInfo = new StringBuilder();
// 添加当前天气信息
WeatherData.CurrentWeather current = weatherData.current();
String temperatureUnit = weatherData.currentUnits() != null ? weatherData.currentUnits().temperatureUnit()
: "°C";
String windSpeedUnit = weatherData.currentUnits() != null ? weatherData.currentUnits().windSpeedUnit() : "km/h";
String humidityUnit = weatherData.currentUnits() != null ? weatherData.currentUnits().humidityUnit() : "%";
weatherInfo.append(String.format("""
当前天气:
温度: %.1f%s (体感温度: %.1f%s)
天气: %s
风向: %s (%.1f %s)
湿度: %d%s
降水量: %.1f 毫米
""",
current.temperature(),
temperatureUnit,
current.feelsLike(),
temperatureUnit,
getWeatherDescription(current.weatherCode()),
getWindDirection(current.windDirection()),
current.windSpeed(),
windSpeedUnit,
current.humidity(),
humidityUnit,
current.precipitation()));
// 添加未来天气预报
weatherInfo.append("未来天气预报:\n");
WeatherData.DailyForecast daily = weatherData.daily();
for (int i = 0; i < daily.time().size(); i++) {
String date = daily.time().get(i);
double tempMin = daily.tempMin().get(i);
double tempMax = daily.tempMax().get(i);
int weatherCode = daily.weatherCode().get(i);
double windSpeed = daily.windSpeedMax().get(i);
int windDir = daily.windDirection().get(i);
double precip = daily.precipitationSum().get(i);
// 格式化日期
LocalDate localDate = LocalDate.parse(date);
String formattedDate = localDate.format(DateTimeFormatter.ofPattern("yyyy-MM-dd (EEE)"));
weatherInfo.append(String.format("""
%s:
温度: %.1f%s ~ %.1f%s
天气: %s
风向: %s (%.1f %s)
降水量: %.1f 毫米
""",
formattedDate,
tempMin, temperatureUnit,
tempMax, temperatureUnit,
getWeatherDescription(weatherCode),
getWindDirection(windDir),
windSpeed, windSpeedUnit,
precip));
}
return weatherInfo.toString();
}
/**
* 获取指定位置的空气质量信息 (使用备用模拟数据)
* 注意:由于OpenMeteo的空气质量API可能需要额外配置或不可用,这里提供备用数据
*
* @param latitude 纬度
* @param longitude 经度
* @return 空气质量信息
*/
@Tool(description = "获取指定位置的空气质量信息(模拟数据)")
public String getAirQuality(@ToolParam(description = "纬度") double latitude,
@ToolParam(description = "经度") double longitude) {
try {
// 从天气数据中获取基本信息
var weatherData = restClient.get()
.uri("/forecast?latitude={latitude}&longitude={longitude}¤t=temperature_2m&timezone=auto",
latitude, longitude)
.retrieve()
.body(WeatherData.class);
// 模拟空气质量数据 - 实际情况下应该从真实API获取
// 根据经纬度生成一些随机但相对合理的数据
int europeanAqi = (int) (Math.random() * 100) + 1;
int usAqi = (int) (europeanAqi * 1.5);
double pm10 = Math.random() * 50 + 5;
double pm25 = Math.random() * 25 + 2;
double co = Math.random() * 500 + 100;
double no2 = Math.random() * 40 + 5;
double so2 = Math.random() * 20 + 1;
double o3 = Math.random() * 80 + 20;
// 根据AQI评估空气质量等级
String europeanAqiLevel = getAqiLevel(europeanAqi);
String usAqiLevel = getUsAqiLevel(usAqi);
return String.format("""
空气质量信息(模拟数据):
位置: 纬度 %.4f, 经度 %.4f
欧洲空气质量指数: %d (%s)
美国空气质量指数: %d (%s)
PM10: %.1f μg/m³
PM2.5: %.1f μg/m³
一氧化碳(CO): %.1f μg/m³
二氧化氮(NO2): %.1f μg/m³
二氧化硫(SO2): %.1f μg/m³
臭氧(O3): %.1f μg/m³
数据更新时间: %s
注意: 由于OpenMeteo空气质量API限制,此处显示模拟数据,仅供参考。
""",
latitude, longitude,
europeanAqi, europeanAqiLevel,
usAqi, usAqiLevel,
pm10,
pm25,
co,
no2,
so2,
o3,
weatherData.current().time());
} catch (Exception e) {
// 如果获取基本天气数据失败,返回完全模拟的数据
return String.format("""
空气质量信息(完全模拟数据):
位置: 纬度 %.4f, 经度 %.4f
欧洲空气质量指数: %d (%s)
美国空气质量指数: %d (%s)
PM10: %.1f μg/m³
PM2.5: %.1f μg/m³
一氧化碳(CO): %.1f μg/m³
二氧化氮(NO2): %.1f μg/m³
二氧化硫(SO2): %.1f μg/m³
臭氧(O3): %.1f μg/m³
注意: 由于API限制,此处显示完全模拟数据,仅供参考。
""",
latitude, longitude,
50, getAqiLevel(50),
75, getUsAqiLevel(75),
25.0,
15.0,
300.0,
20.0,
5.0,
40.0);
}
}
/**
* 获取欧洲空气质量指数等级
*/
private String getAqiLevel(Integer aqi) {
if (aqi == null)
return "未知";
if (aqi <= 20)
return "优";
else if (aqi <= 40)
return "良";
else if (aqi <= 60)
return "中等";
else if (aqi <= 80)
return "较差";
else if (aqi <= 100)
return "差";
else
return "极差";
}
/**
* 获取美国空气质量指数等级
*/
private String getUsAqiLevel(Integer aqi) {
if (aqi == null)
return "未知";
if (aqi <= 50)
return "优";
else if (aqi <= 100)
return "中等";
else if (aqi <= 150)
return "对敏感人群不健康";
else if (aqi <= 200)
return "不健康";
else if (aqi <= 300)
return "非常不健康";
else
return "危险";
}
public static void main(String[] args) {
OpenMeteoService client = new OpenMeteoService();
// 北京坐标
System.out.println(client.getWeatherForecastByLocation(39.9042, 116.4074));
// 北京空气质量(模拟数据)
System.out.println(client.getAirQuality(39.9042, 116.4074));
}
}注册服务:自己new一个@Configuration的配置类然后编写下面这个即可
    @Bean
    public ToolCallbackProvider weatherTools(OpenMeteoService openMeteoService) {
        return MethodToolCallbackProvider.builder().toolObjects(openMeteoService).build();
}如何使用:本地的话只能打包成jar包,然后供本地mcp client调用
基于stdio的MCP客户端client实现
<!-- 添加Spring AI MCP starter依赖 -->
<dependency>
    <groupId>org.springframework.ai</groupId>
    <artifactId>spring-ai-mcp-client-spring-boot-starter</artifactId>
    <version>1.0.0-M6</version>
</dependency>server:
port: 8083
spring:
application:
name: lec-agent
ai:
dashscope:
api-key: ${your-api-key}
mcp:
client:
stdio:
# 指定MCP服务器配置文件路径(推荐)
servers-configuration: classpath:/mcp-servers-config.json
# 直接配置示例,和上边的配制二选一
# connections:
# server1:
# command: java
# args:
# - -jar
# - /path/to/your/mcp-server.jarmcp-servers-config.json:classpath:/默认就是指src/main/resource
这里填入我们上面Server打包好的jar包位置
{
    "mcpServers": {
        "weather": {
            "command": "java",
            "args": [
                "-Dspring.ai.mcp.server.stdio=true",
                "-Dspring.main.web-application-type=none",
                "-Dlogging.pattern.console=",
                "-jar",
                "这里填入我们上面Server打包好的jar包位置"
            ],
            "env": {}
        }
    }
}
编写测试文件,Configuration仅用作演示
@Configuration
public class WeatherProperties {
    @Bean
    public CommandLineRunner predefinedQuestions(
            ChatClient.Builder chatClientBuilder,
            ToolCallbackProvider tools,
            ConfigurableApplicationContext context) {
        return args -> {
            // 构建ChatClient并注入MCP工具
            var chatClient = chatClientBuilder
                    .defaultTools(tools)
                    .build();

            // 定义用户输入
            String userInput = "北京的天气如何?";
            // 打印问题
            System.out.println("\n>>> QUESTION: " + userInput);
            // 调用LLM并打印响应
            System.out.println("\n>>> ASSISTANT: " +
                    chatClient.prompt(userInput).call().content());

            // 关闭应用上下文
            context.close();
        };
    }
}如何使用:
先启动server项目,再启动client项目即可
(注意:端口冲突,路径是否正确,依赖是否正确.......)
yaml出现了一下也不影响:
无法解析配置属性 'spring.ai.mcp.client.stdio.servers-configuration'
基于SSE的MCP服务端Server实现
基本和stdio相同,主要是依赖
这里我直接使用官网的例子了
<dependency>
   <groupId>org.springframework.ai</groupId>
   <artifactId>spring-ai-mcp-server-webflux-spring-boot-starter</artifactId>
</dependency>server:
port: 8080 # 服务器端口配置
spring:
ai:
mcp:
server:
name: my-weather-server # MCP服务器名称
version: 0.0.1 # 服务器版本号省略:OpenMeteoService
注册Service服务:
@SpringBootApplication
public class McpServerApplication {

    public static void main(String[] args) {
        SpringApplication.run(McpServerApplication.class, args);
    }

    @Bean
    public ToolCallbackProvider weatherTools(OpenMeteoService openMeteoService) {
        return MethodToolCallbackProvider.builder()
                .toolObjects(openMeteoService)
                .build();
    }

    @Bean
    public WebClient.Builder webClientBuilder() {
        return WebClient.builder();
    }
}
同样maven打包成jar
基于SSE的MCP服务端Server实现
SSE方式不需要通过.json绑定jar包,直接在yaml中指定url即可
同上
<dependency>
   <groupId>org.springframework.ai</groupId>
   <artifactId>spring-ai-mcp-client-webflux-spring-boot-starter</artifactId>
</dependency>在application.yml中配置 MCP 服务器,这里需要指定 SSE 启动的服务地址,之前我们在 8080 端口上启动了对应的服务:
spring:
  ai:
    dashscope:
      api-key: ${DASH_SCOPE_API_KEY}
    mcp:
      client:
        sse:
          connections:
            server1:
              url: http://localhost:8080  #服务地址
Client客户端实现
使用方式与基于 stdio 的实现相同,只需注入ToolCallbackProvider和ChatClient.Builder:
@SpringBootApplication
public class Application {

    public static void main(String[] args) {
        SpringApplication.run(Application.class, args);
    }

    @Bean
    public CommandLineRunner predefinedQuestions(ChatClient.Builder chatClientBuilder,
                                                ToolCallbackProvider tools,
                                                ConfigurableApplicationContext context) {
        return args -> {
            // 构建ChatClient并注入MCP工具
            var chatClient = chatClientBuilder
                    .defaultTools(tools)
                    .build();

            // 使用ChatClient与LLM交互
            String userInput = "北京的天气如何?";
            System.out.println("\n>>> QUESTION: " + userInput);
            System.out.println("\n>>> ASSISTANT: " + chatClient.prompt(userInput).call().content());

            context.close();
        };
    }
}
这里直接启动测试
启动之后会有报错:
Caused by: java.lang.IllegalStateException: Multiple tools with the same name (spring-ai-mcp-client-getWeatherForecastByLocation, spring-ai-mcp-client-getAirQuality)
        at org.springframework.ai.mcp.SyncMcpToolCallbackProvider.validateToolCallbacks(SyncMcpToolCallbackProvider.java:126) ~[spring-ai-mcp-1.0.0-20250325.064812-147.jar:1.0.0-SNAPSHOT]
        at org.springframework.ai.mcp.SyncMcpToolCallbackProvider.getToolCallbacks(SyncMcpToolCallbackProvider.java:110) ~[spring-ai-mcp-1.0.0-20250325.064812-147.jar:1.0.0-SNAPSHOT]
        at org.springframework.ai.autoconfigure.mcp.client.McpClientAutoConfiguration.toolCallbacksDeprecated(McpClientAutoConfiguration.java:196) ~[spring-ai-mcp-client-spring-boot-autoconfigure-1.0.0-M6.jar:1.0.0-M6]
        at java.base/jdk.internal.reflect.DirectMethodHandleAccessor.invoke(DirectMethodHandleAccessor.java:103) ~[na:na]
        at java.base/java.lang.reflect.Method.invoke(Method.java:580) ~[na:na]
        at org.springframework.beans.factory.support.SimpleInstantiationStrategy.lambda$instantiate$0(SimpleInstantiationStrategy.java:171) ~[spring-beans-6.2.0.jar:6.2.0]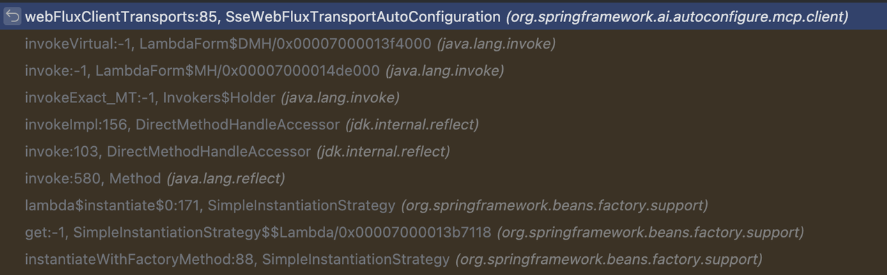
... 23 common frames omitted从日志上分析,是因为注册了相同的服务名spring-ai-mcp-client-getWeatherForecastByLocation和spring-ai-mcp-client-getAirQuality,但是从代码上分析,这两个服务我们都只注册了一次,那为什么会报错呢?
其实这是 Spring AI 目前的一个 BUG,Spring AI 提供了两个自动配置类去生成客户端工具处理 MCP 服务中 Tool 的获取,分别是SseHttpClientTransportAutoConfiguration和SseWebFluxTransportAutoConfiguration。这两个自动配置类提供了同步和异步两种方式,本身应该是互斥的,但是 Spring AI 对于互斥的处理上出了问题,导致两个自动配置类都会加载。
SseWebFluxTransportAutoConfiguration的加载:
SseHttpClientTransportAutoConfiguration的加载:
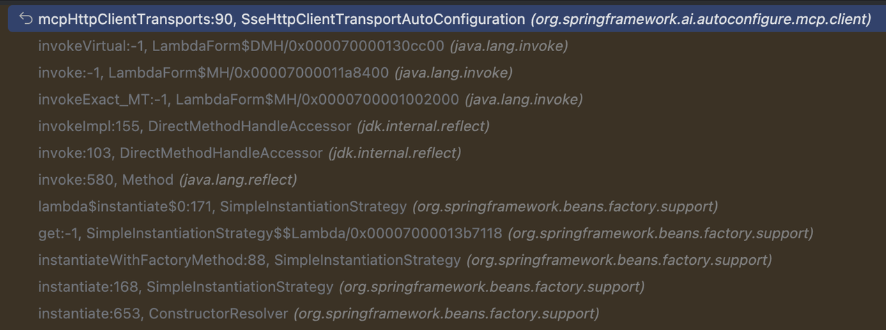
两个自动配置类加载之后,就会向提供 SSE 服务的 MCP 服务申请 Tool,这样就导致同样的 Tool 被申请了两次,自然就会重复了。解决方案也非常简单,在启动类上排除SseHttpClientTransportAutoConfiguration实现就可以了。
解决方案:手动exclude
@SpringBootApplication(exclude = {
        org.springframework.ai.autoconfigure.mcp.client.SseHttpClientTransportAutoConfiguration.class
})
public class Application {
...
MCP客户端与远程MCP服务
MCP-GitHub
前置配置
<dependency>
    <groupId>org.springframework.ai</groupId>
    <artifactId>spring-ai-mcp-client-spring-boot-starter</artifactId>
    <version>1.0.0-M6</version>
</dependency>server:
port: 8081
spring:
application:
name: lec-ai
ai:
dashscope:
api-key: ${your-api-key}
mcp:
client:
stdio:
servers-configuration: classpath:/mcp-servers-config.json{
"mcpServers": {
"github": {
"command": "cmd",
"args": [
"/c",
"npx",
"-y",
"@modelcontextprotocol/server-github"
],
"env": {
"GITHUB_PERSONAL_ACCESS_TOKEN": "your token"
}
}
}
}**TIP:**win和mac的写法不一样
mac:
{
  "mcpServers": {
    "github": {
      "command": "npx",
      "args": [
        "-y",
        "@modelcontextprotocol/server-github"
      ],
      "env": {
        "GITHUB_PERSONAL_ACCESS_TOKEN": "`"
      }
    }
  }
}
申请token
github/github-mcp-server: GitHub's official MCP Server

手动勾选赋予权限
简单调用
@SpringBootApplication
public class SpringAIAlibabaStudy {
    public static void main(String[] args) {
        SpringApplication.run(SpringAIAlibabaStudy.class, args);
    }

    @Bean
    public CommandLineRunner predefinedQuestions(
            ChatClient.Builder chatClientBuilder,
            ToolCallbackProvider tools,
            ConfigurableApplicationContext context) {
        return args -> {
            // 构建ChatClient并注入MCP工具
            var chatClient = chatClientBuilder
                    .defaultTools(tools)
                    .build();

            // 定义用户输入
            String userInput = "帮我创建一个私有仓库,命名为test-mcp";
            // 打印问题
            System.out.println("\n>>> QUESTION: " + userInput);
            // 调用LLM并打印响应
            System.out.println("\n>>> ASSISTANT: " +
                    chatClient.prompt(userInput).call().content());

            // 关闭应用上下文
            context.close();
        };
    }
}